Nathan arrived, as promised, at 8AM to help out with the EV. I had made much less progress than I hoped; I had planned to lower the motor and start drilling the new brush holes. I actually got as far as mangling the passenger side axle nut.
Nathan pronounced my mangling job professional and declared that we would need to let the pros take off the nut, probably using propane torches. I asked if it would be safe to drive as-is.
He actually guffawed. He rolled his eyes at me and responded, "You'll be fine. That nut ain't goin' nowhere."
I can't argue with him; I pounded that bolt for two hours with cold chisels, and it's NOT coming off. Having experienced its power first-hand, I now wonder why we don't make things out of rust.
Nathan agreed with my assessment on the axle, though: it would need to be removed before we could drop the motor any farther. We attacked it with pry bars. It was a bear, but within 30 minutes we had it out.
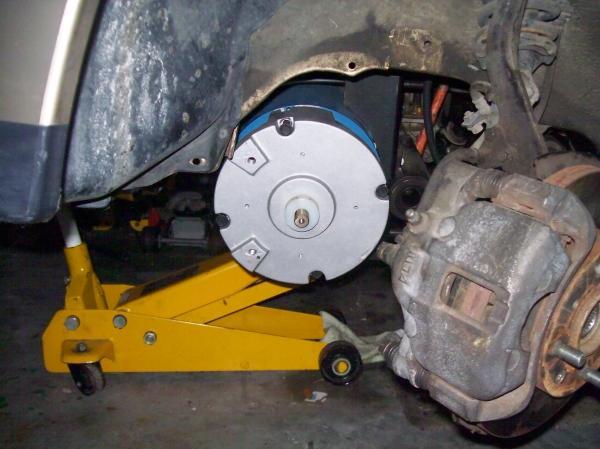
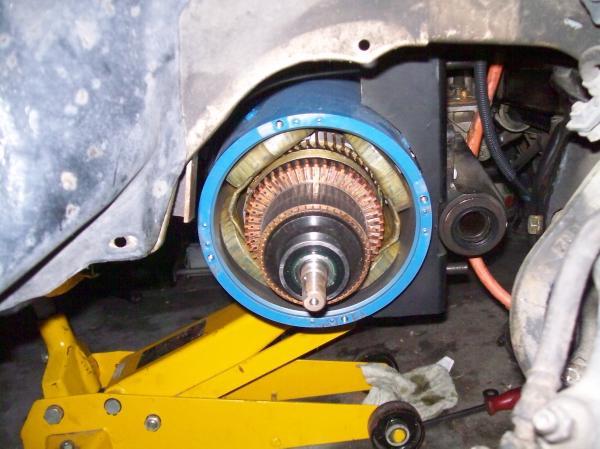
Then we dropped the motor. It levered down until it presented the brush endcap right through the driver side wheel well. We pulled the brush cap off, exposing the commutator and the casing, ready to drill.
If you look closely, you can see that there are several holes there already. The brushes mount in four places, and there are three positions for each. According to the EV list, standard motor rotation needs 10 degrees of advance to avoid arcing. Hondas go the other way (counter-clockwise as you look at the transmission), and only require 7.5 degrees of advance.
Normally these motors ship with three holes (+10 degrees, neutral, and -7.5 degrees), but when Nathan tried to move the brushes, he found there were only two holes. The EV list told us we had a very old motor, with one setting for neutral and the other for 10 degrees advanced. We guessed on which way was neutral, and drilled holes in the opposite direction at 3/4 the distance. Unfortunately, we guessed the wrong direction, so our motor was 17.5 degrees advanced -- or, for our reverse rotation, 17.5 degrees retarded.
I measured the outside diameter of the motor casing (9", as advertised). That gave me a circumference, which I divided by 360 to find one degree. I multiplied that by 7.5 to find how far to make my marks, and marked the location for the new brush holes.
Then we started drilling. We used small bits and slowly worked our way up to 17/64". That's the same as 8mm, but it's tough to find metric tools in America. They look at you like you're crazy. "Milli-whut?" Ace Hardware had an 8mm tap, amazingly enough, along with some extra bits. But I digress.


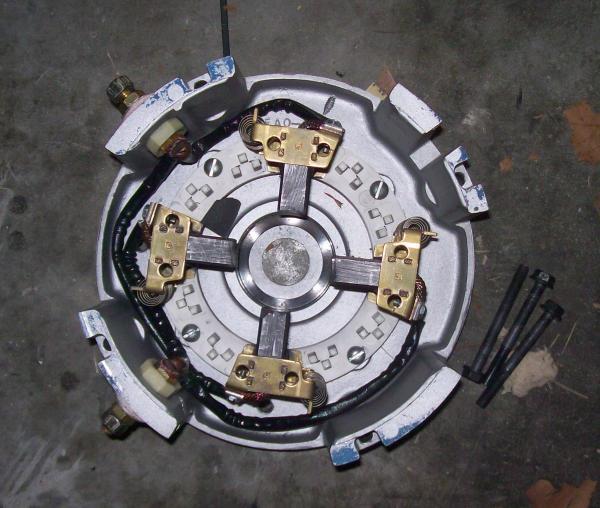
Rather than drilling the last bot freestyle, we replaced the endcap and used the bolt hole as a guide. That's when we noticed that the brushes were spring loaded, and removing them could've been easier if we'd pulled the spring clips first. We also found that we'd flaked a big chip off one crush and chipped another. (Could someone with more EV experience than me look at these? Do I need new brushes? Jim?)
We pulled the spring clips back onto their retaining notches, reseated the endcap over our new hole, reseated the spring clips to provide friction so the cap wouldn't move easily, and drilled with Nathan's special extra-long 17/64" drill bit. Then we pulled the endcap off and tapped the new hole.
That's deceptively simple to say. It takes patience and strength to get it done properly. After 20 minutes or so, we put the endcap back on and tried our new bolt hole. Perfect fit!
While the cap was on, we drilled a mark for the next hole. The same process made a perfect fit for that bolt, too. With the endcap well secured, we drilled marks for the final two holes.
The third hole drilled as planned, but the fourth hole hated us. As we were drilling our smallest pilot hole, the drill shattered in the hole, in a weird spiral pattern. We could get some of the debris out, but only 5 or 6 millimeters total.
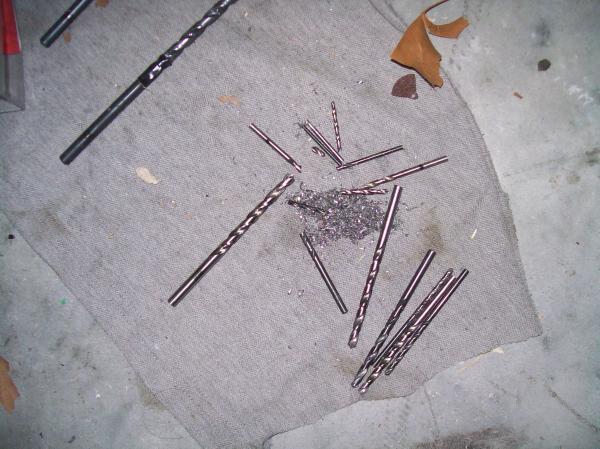
Of course, the bit is harder than the surrounding steel. It's tough to drill through a drill bit. We got the bright idea to use our smallest remaining bit to drill out around the bit. That got us another broken bit.
We dulled or broke all the rest of our bits trying to drill the little one out. We got a hole about 10mm deep. Since the bottom 2mm of the tap simply center the tap in the hole, that means about 8mm of thread. Nathan had heard that the rule of thumb for bolts is that they get maximum pull at 1-1/2 times their width; that means our 8mm bolt would need 12mm for best effectiveness.
Of course, this is a brush housing. It doesn't need to withstand lots of force. We decided to just use some washers to "shorten" the bolt and live with it.
When we started to tap the third hole, the tap broke. Looks like it's our weekend for breaking tools! Ace was already closed, so I'll have to return that (and the broken bits) tomorrow. We scoured town, but nobody had an 8mm tap. Time to call it a day.
We didn't want the car to know that it had beaten us so easily, so we cleaned up a few things before heading out to dinner at Bubbaloo's. On the way we checked out my new charging space.
It's right at the front of the building. I didn't ask for that privilege, especially considering that it's not my building. They've gone the extra mile for me; now if I can just get my car to go 6 miles...