10-23-05: We've finally got all the parts (even after we received the adapter, there was trouble with the transmission). Assembly is ready to begin. But it's been so long, will we even be able to put the EV together?
Any day Nathan has the opportunity to work on my EV is a good day. (Thanks again, bro!)
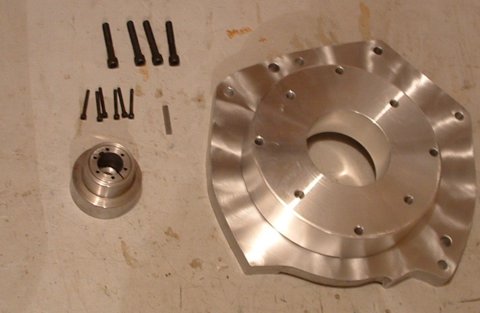
There was some confusion, caused by the trouble that our "adaptor ring" didn't fit. Nathan couldn't find an adaptor ring on the old adaptor. Turned out it was still bolted to our motor; he had thought it was an endcap for the motor. After removing it, things proceeded to the next error.
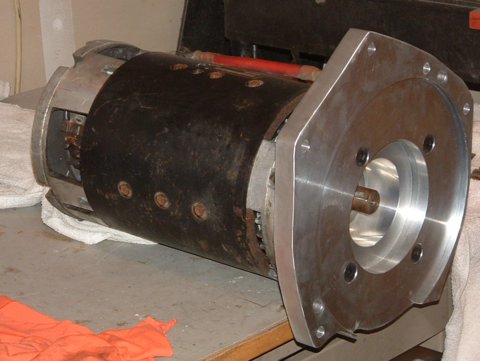
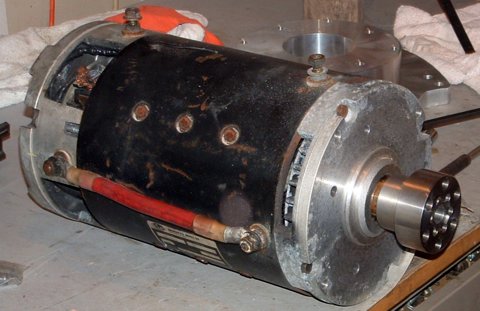
The adaptor allowed us to mount the motor in any of four positions. We decided to run the electrical connections to the bottom, for easy access. We'll need to keep them protected from the elements, of course; it's going to be pretty high up in the engine compartment, so a plastic or metal shield should do the job. But wait! This is a 14-step procedure! Surely there's news to report on other steps?
"4. Insert key in slot on motor shaft." As I hadn't removed the old key (it was rusted on and rust is a mighty opponent) I skipped this step. I did make sure both keys were identical. They were.
Well, at least there's that. I must admit I'm not all that comfortable driving a car held together by rust, but hey -- I can adjust. I'll probably forget all about it in a week. Nathan claims that the car isn't held together by rust: the key is a friction fit, and the rust supplies more friction, therefore making it BETTER. Uh-huh.
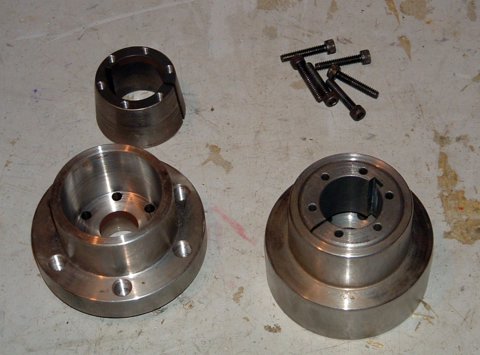
Then the bushing was stuck on the hub. That took some experimentation. Then it wouldn't go on the shaft. That required sandpaper (for rust removal) and a few smacks from a bare hand (it's not really auto mechanics unless you have to hit something). Unfortunately, that bushing needs to be positioned so that the distance from the flywheel to the adapter is 0.755" +/- .010". Repositioning means partial disassembly and reassembly. What does Nathan think about this?
This means that the position of the bushing is crucial to the proper fit of the adaptor assembly. I also know that I do not have the fine measurement tools necessary to measure that and it will require either buying one (approx. $100) or paying someone to measure it for me (much cheaper, but I'll have to haul the motor/adaptor assembly down to them (delaying us a good bit) and if the measurement is off do it all over again. (delaying us a good bit more) So I've thought about it, particularly about how crucial that fit is. Is it really necessary to have it to within one hundredth of an inch? What that fit does is determine how far the input shaft of the tranny slides into the pilot bearing. The pilot bearing makes sure the input shaft and flywheel (and therefore the crankshaft) line up perfectly. But it is .25" inches thick. And the input shaft goes all the way through and out the other side. That means the measurment would have to be at least .10" off to cause misalignment. That's eyeball territory. So I go with it.
How can you argue with that? I replied: Mumble, mumble, pizza, mumble, quantum flux, Jeffries tube, adaptive triphasic harmonics, and Bob's your uncle. If you're confident that I'm not going to get a heavy vibration, I'm cool.
Then there was the bit where the bushing was on backwards, requiring a complete disassembly and reassembly. Nathan does get a little creative...
This time I put on the bushing and hub first. I don't know why the instructions don't say to do it this way. The adaptor ring and profile plate can go on last, and this way I won't have to remove them if I make another bonehead mistake.
Based on our experiences thus far, I think he knows why they don't say to do it that way. C'mon, when did he get so much faith in humanity?
"8. Use 10 - 24 allen-head screws provided to pull hub over bushing, securing hub/bushing assembly to shaft. (hub will pull over bushing about 0.70.)" Notice that none of these instructions has torque specs. So I redneck torque them.
I hope this means, "I used a torque wrench and incrementally adjusted them to an arbitrary (but, experience indicates, sufficient) equal value." My wife believes it means, "I tightened them with my socket wrench until I couldn't turn 'em no more."
Turns out she's right. Nathan doesn't even own a torque wrench. Ah, well. I guess that's an arbitrary, reasonably equivalent value.
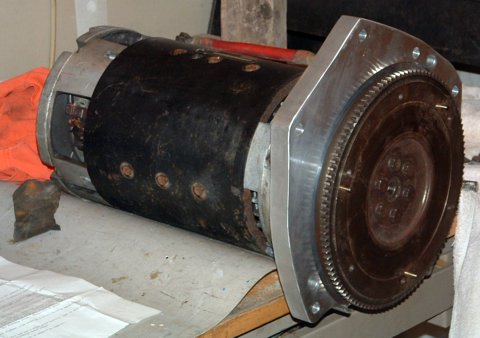
After that, it's pretty much over except for the shouting. The flywheel gets installed, with redneck torque again. At least that time Nathan's relying on experience to tell him that's all that's required.
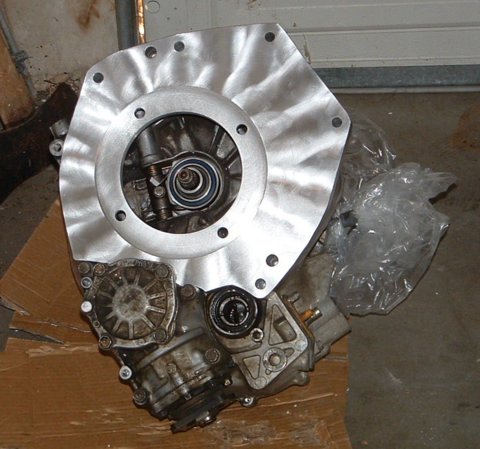
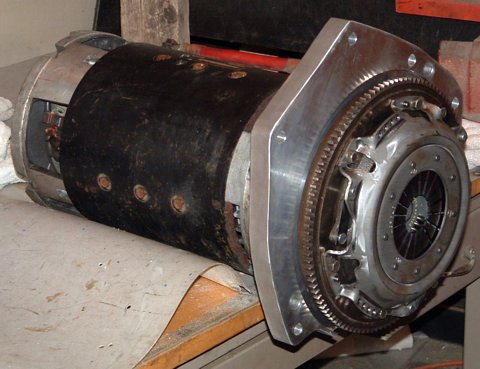
You would think that after installing the adaptor, any reasonable person would call it a day and go have a beer. But no, Nathan goes on to install the clutch, too. Actually putting the whole assembly should be delayed until he can get some bolts to attach the adapter to the transmission:
Originally, the tranny bolts passed through the tranny housing and bolted into tapped holes in the block. The holes in the adaptor plate (which simulates the block) have not been tapped. So I'll need bolts which pass through both and have a nut. But I don't own any of these, as I discover after thoroughly searching my bolt drawer. So I go out to get some and decide while I'm out, I'll get a new fill plug for the tranny. (remember the fill plug?)
Oh, yes, I remember the fill plug. With uncontrollable giggling. If you don't, I really recommend you go read about the fill plug (a report which contains some mild language).

Unfortunately, he can't find a fill plug, but he does get the new bolts. $22.07, bringing the total cost up to (who knows? I'll figure that out later). He rigs something up to help with the alignment and even starts on getting the clutch and adapter connected together. Unfortunately, one stud won't fit. I figure leaving the stud off is like leaving off that fourth bolt on the VW tranny that's so difficult to reach. Nathan figures it's more like leaving off a sixth finger. Anyway, time to celebrate!
I celebrate the much-delayed successful installation of the adaptor by deciding to go to John Ascuagas' Nugget and trying their legendary "awful awful burger" I've been told about this burger by no less than 4 different people, all of whom told me it was great. I've been saving it for a special occasion. But it was a letdown. The meat was unseasoned and the patty thin, the relish sauce was uninspired, putting 2 meat pattys on made the sandwich unmanageable and difficult to eat and the bun couldn't take the stress of holding the burger together. Burger Boy says, "Next time, I'll try the Reuben."
Phew. A busy day. But a lot of progress. Good job, Nathan!